Photoshop face swap, step by step: three manual methods that actually blend
Swapping a face in Photoshop comes down to picking the right blending path for your two photos and committing to it. For most beginners that is a Layer Mask with the Quick Selection Tool and a soft brush. For the most realistic result, use the Lasso Tool plus Select > Modify > Contract with Match Color. When both photos already share lighting and angle, Edit > Auto-Blend Layers does the tone work for you in one click. The rest of this guide walks each method end to end, then fixes the five mistakes that turn a good swap into an obvious paste.
What you need before you start
The blending step gets all the attention, but the swap is decided before you open Photoshop. Pick the wrong pair of photos and no amount of masking saves it.
- Two photos: a source image with the face you want to copy, and a target image with the face being replaced.
- Lighting direction and color temperature that roughly match between the two shots. Side-lit vs. flat front light is the single hardest mismatch to repair.
- A camera angle on the source face that comes close to the target. Profile against three-quarter view will fight you the whole edit.
- Adobe Photoshop on desktop. Steps below were checked against Photoshop 2024 on Windows and Mac; the Auto-Blend Layers dialog with Content Aware Fill Transparent Areas has been present since Photoshop 2018.
- The target file open with its background layer duplicated (Ctrl+J / Cmd+J). Edit only the duplicate so the original stays intact.
- A source face that is the same size as the target or larger. Scaling a big face down preserves detail; pushing a small face up reveals every pixel.
One often-skipped pre-step: edit both photos with similar exposure and white balance before the swap. Five minutes in Camera Raw on each file pulls the color temperature close enough that Match Color does not have to reach later.
Method 1: Layer Mask with the Quick Selection Tool (best for beginners)
Use this path when the two photos already look reasonable together and you mostly need a clean transition around the jaw and forehead. It is the fastest route from raw files to a sharable result.
- Open both files via File > Open. Two separate document windows is fine.
- On the source image, press W for the Quick Selection Tool. Drag across the eyes, nose, mouth, and cheeks to build a selection. Hold Alt (Win) or Option (Mac) and click to remove anything the tool grabbed by mistake, like an earring or a strand of hair.
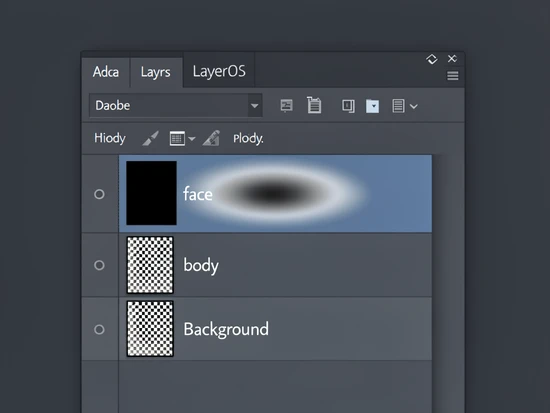
- Right-click inside the selection and choose Layer via Copy. Rename the new layer face in the Layers panel.
- Switch to the Move Tool (V) and drag the face layer onto the target document window. It lands as a new layer in the target file.
- Drop the face layer opacity to 50%. You should now see the target face faintly through the source face. Press Ctrl+T / Cmd+T for Free Transform, then resize, rotate, and reposition until the eyes line up first, then the mouth. Press Enter. Restore opacity to 100%.
- With the face layer selected, click the Layer Mask icon (rectangle with a circle) at the bottom of the Layers panel.
- Press B for the Brush Tool. Set the foreground color to black, hardness around 50–70%, flow 100%, opacity 100%. Paint along the edges of the face layer on the mask. Black hides; the target body underneath comes back through.
- If you erase a piece you wanted to keep, press X to swap foreground to white and paint that area back. The detail is not gone, only hidden. This single keystroke is the most useful recovery move in the whole workflow.
- Zoom out to a 50–100% view every minute or two. Mistakes that disappear at 200% zoom jump out at fit-to-screen.
Method 2: Lasso Tool with Contract Selection and Match Color (best for realism)
When the swap has to survive zoomed-in inspection, this is the method. The Lasso plus a feathered, contracted selection eliminates the hard seam that Method 1 sometimes leaves around the temples, and Match Color does the heavy lifting on skin tone in one pass.
- Open both files. In the target document, press Ctrl+J / Cmd+J to duplicate the background layer and rename the duplicate body.
- On the source image, press L for the Lasso Tool. In the Options bar, set Feather to 10px. The hard-edged selection is the single biggest reason a face swap looks pasted on, and a 10px feather is the fix per the psdvault.com Photoshop face swap walkthrough.
- Trace around the eyebrows, eyes, nose, mouth, and just inside the hairline. Stay off the actual hair line; you want a face oval, not a head cutout.
- Press Ctrl+C / Cmd+C to copy. Switch to the target document and Ctrl+V / Cmd+V to paste. Rename the new layer face.
- Lower the face layer opacity to 30–50%. Press Ctrl+T / Cmd+T and align the features against the target face beneath. Press Enter, restore opacity to 100%.
- Hold Ctrl/Cmd and click the face layer thumbnail to load the face shape as a selection.
- Go to Select > Modify > Contract, enter 6 pixels, click OK. This shrinks the active selection inward. The reason is mechanical: the body layer underneath needs a hole that is slightly smaller than the face on top, so the soft edge of the face layer always overlaps body pixels, never empty space.
- Click the body layer in the Layers panel to make it active. Press Delete. Photoshop punches a face-shaped hole in the body layer. Press Ctrl+D / Cmd+D to deselect.
- Click the face layer. Go to Layer > Layer Mask > Reveal All. With a soft black brush at low flow (around 20%), feather any spots where the seam still shows, especially around the chin and forehead.
- With the face layer still selected, go to Image > Adjustments > Match Color. In the Source dropdown choose your target document; in Layer choose body. Drag Luminance and Color Intensity until the face takes on the body's tonal cast. Pull the Fade slider up to about 40–60% so the correction blends rather than overrides; running it at full strength almost always looks plastic.
- Add a Hue/Saturation Adjustment Layer above the face layer, then hold Alt/Option and click between the two layer rows to clip the adjustment to the face only. Nudge Hue, Saturation, and Lightness in single-digit moves until the cheek and neck color agree.
- Press S for the Clone Stamp Tool or J for the Healing Brush. Sample skin texture from the target body's neck and paint over any seam line that survived the mask.
Pro tip: tile your two documents (Window > Arrange > Tile All Vertically) before you start. You can drag the face layer straight from the source thumbnail into the target window, which is faster than copy-paste and keeps you in one mental loop.
Method 3: Auto-Blend Layers (fastest path to a clean blend)
Auto-Blend Layers is the right tool when both photos already share lighting and face angle. Photoshop computes the color and tone match for you, which is faster than running Match Color manually. When the inputs disagree on lighting, fall back to Method 1 or 2; Auto-Blend amplifies what is already there rather than fixing what is not.
- Open both files. Press L for the Lasso Tool and draw around the eyebrows, eyes, nose, and mouth on the source image.
- Ctrl+C / Cmd+C, switch to the target document, Ctrl+V / Cmd+V to paste. Press Ctrl+D / Cmd+D to deselect.
- Drop opacity to about 30%. Free Transform (Ctrl+T / Cmd+T) the face into alignment with the target features. Enter to confirm, restore opacity to 100%.
- Right-click the background and choose Duplicate Layer, or press Ctrl+J / Cmd+J. Rename the duplicate Body. Click the eye icon on the original Background to hide it.
- Hold Ctrl/Cmd and click the face layer thumbnail to reload its selection. Then click the eye icon on the face layer to hide it for a moment.
- Go to Select > Modify > Contract and enter 10 pixels. Click OK. The 10px value matches the recipe published by clippingpathhouse.com and gives Auto-Blend a wider feathering region to work with.
- Click the Body layer to make it active. Press Delete, then Ctrl+D / Cmd+D. Click the eye icon on the face layer to bring it back.
- Hold Shift and click both the Face and Body layers so they are selected together. Go to Edit > Auto-Blend Layers.
- In the dialog, choose Panorama, tick Seamless Tones and Colors, tick Content Aware Fill Transparent Areas, click OK. Photoshop reconciles luminance and color across the two layers and fills any gap left by the contract step.
- Inspect the result at 100%. If a faint line survives along the jaw, paint across it with the Healing Brush (J), sampling from clean skin a centimeter away.
Which method fits your photos?
| Photo conditions | Best method | Why |
|---|---|---|
| Casual snapshot, lighting roughly matches, you are new to compositing | Method 1 (Layer Mask + soft brush) | Forgiving, fully manual control over every edge, fastest to learn. |
| Portraits with visible skin tone difference and you want zoom-proof realism | Method 2 (Lasso + Contract + Match Color) | Contract removes the hard seam at the source; Match Color and a clipped Hue/Saturation handle the tonal mismatch. |
| Both shots share lighting direction and head angle; you want a one-shot blend | Method 3 (Auto-Blend Layers) | Photoshop computes Seamless Tones and Colors automatically and patches gaps with Content Aware Fill. |
| Photos taken at different times of day or under different light sources | Method 2, plus a Camera Raw pre-pass | Pre-matching exposure and white balance gives Match Color a realistic starting point; Auto-Blend tends to overcorrect on mismatched lighting. |
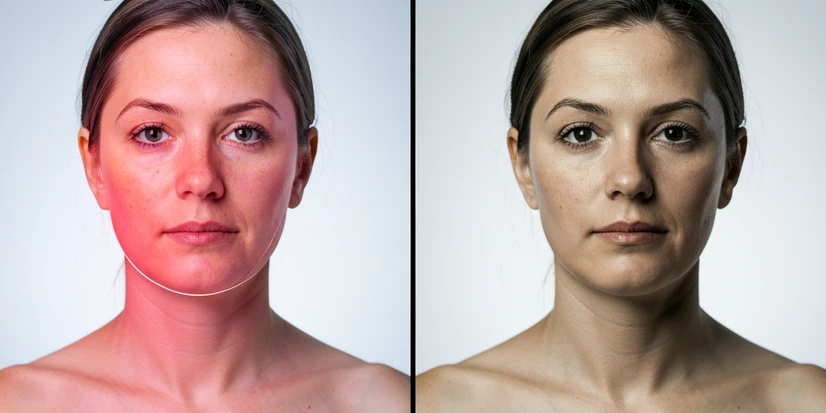
How to match skin tone after the swap
Skin tone mismatch is the loudest tell of an obvious face swap. The fix is layered: one global correction, one targeted adjustment, and one channel-level check.
- Global pass with Match Color. Select the face layer, run Image > Adjustments > Match Color, set Source to the current document, set Layer to body. This pulls the face's overall color cast toward the body. Use the Fade slider to dial back to a believable level; full strength rarely looks right.
- Targeted pass with Hue/Saturation. Add a Hue/Saturation Adjustment Layer above the face layer and clip it (Alt/Option + click between layers). Nudge Hue by 1 to 3 degrees, Saturation by 5 to 10 points if the face reads too pink, Lightness only if the face is darker or brighter than the neck.
- Shadow/highlight pass with Curves. Add a clipped Curves Adjustment Layer. Drop a point on the shadow region and lift or lower it until the eye sockets read at the same darkness as the body's natural shadows. Do the same for highlights on the cheekbones.
- Channel check. Open the Channels panel (Window > Channels) and click the Red, Green, and Blue thumbnails one at a time. A skin tone cast that hides in RGB often shows clearly in a single channel. If the Red channel looks blotchy on the face but smooth on the body, that is your remaining mismatch.
Reference point worth remembering: the neck just below the jaw is the cleanest skin sample on the target body. It sits in the same lighting as the face will, with no make-up, hair, or jewelry to distort the reading. Sample there with the Color Picker (I) and use that swatch as your tonal target.
Common mistakes and how to fix them
Mismatched lighting between the two photos
Why it breaks: a face lit from the right pasted onto a body lit from the left puts highlights and shadows on opposite sides of the same head. The brain catches it instantly even when the colors look fine. Fix: pre-match exposure and white balance in Camera Raw, then run Match Color and a clipped Hue/Saturation layer to harmonize what is left. If the lighting direction itself is reversed, redo the swap with a different source photo. No adjustment layer can re-light a face that was lit the wrong way.
Forgetting to lower opacity before aligning
Why it breaks: at 100% opacity the pasted face hides the target underneath, so eye-to-eye and mouth-to-mouth alignment becomes guesswork. Fix: drop the face layer to 30–50% before pressing Ctrl+T / Cmd+T. The target features show through as a faint registration guide, and 100% goes back on after Enter.
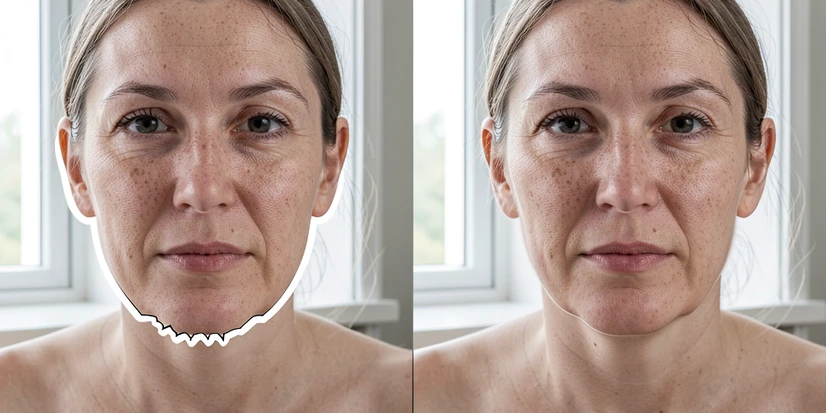
Skipping Contract Selection
Why it breaks: when you delete a face-shaped hole from the body layer using the unmodified face selection, the hole has the exact same outline as the face on top. Any anti-aliased pixel along the edge of the face layer falls onto a transparent edge of the body layer, which produces the hard line that screams 'composite'. Fix: Select > Modify > Contract by 6 pixels for Method 2 or 10 pixels for Method 3, then delete. The body opening becomes slightly smaller than the face, so the soft edge of the face layer always lands on body pixels.
Over-erasing the face layer with the mask brush
Why it breaks: the layer mask hides pixels rather than deleting them. A panicky reader who just erased half a cheek often assumes the detail is gone and starts over. It is not gone. Fix: press X to swap foreground from black to white, then paint over the erased area on the mask. The original face data returns instantly. The same X keystroke is the single most useful shortcut in the entire workflow.
Hard-edged selections
Why it breaks: a zero-feather Lasso selection produces a 1-pixel-wide transition between the cut-out face and the empty surroundings. Even a soft mask cannot fully recover a sharp boundary that was baked into the layer at copy time. Fix: set Lasso Feather to 10px in the Options bar before drawing, or use a soft-edged Brush at 50–70% hardness when painting the mask later.
Saving your work and using face swaps responsibly
Save the working file as PSD at every milestone: after alignment, after masking, after color correction. PSD preserves layers, masks, and adjustment layer settings; you can return to any stage and rework it. Export a flattened JPEG or PNG only for sharing, and keep the PSD as the master.
Never flatten the layered file itself. Once layers are merged the mask, the clipped adjustments, and the face cutout are baked in, and any rework starts from scratch. Use File > Export > Export As for the JPEG instead. The History panel (Window > History) helps too, but History resets when the file closes; PSD checkpoints survive.
On the human side: get permission before publishing a swap that uses someone else's likeness, especially anything commercial. Avoid edits that are demeaning, deceptive, or could damage a person's reputation. The technical workflow is neutral; the choice of subject is not.
quick q before i try this, is it actually legal to swap someone's face into a photo without asking them? article only mentions permission in two sentences at the bottom