Run FaceFusion on your own GPU and finish your first face swap
Face swapping on local hardware means the media never leaves your machine. You install FaceFusion once, pick the execution provider that matches your GPU, load a source face and a target image or video, then press Start. The whole pipeline runs on Nvidia, AMD, or Apple Silicon. Two install routes exist: a no-terminal Pinokio path for beginners and a manual command-line path for people who want control. The single decision that makes or breaks performance is the execution provider, so most of this guide bends toward getting that right.
What you need before installing FaceFusion locally
A compatible GPU does most of the work. FaceFusion supports both Nvidia and AMD cards, and a fast GPU keeps render times reasonable instead of painful. No fast GPU on hand? You can fall back to a rented cloud GPU, but this guide stays strictly local, so everything below assumes the work happens on hardware you control.
- A compatible GPU, Nvidia or AMD, ideally a fast one.
- Python 3 and the ability to create and activate a virtual environment (venv).
- ffmpeg installed, which the manual and Linux path needs for video output.
- An onnxruntime build that matches your execution provider and CUDA version.
That last item is where most installs die. The onnxruntime package has to line up with the backend you intend to use. Pick the CUDA build on Nvidia, the right provider build on AMD, or the default on a Mac. Get this pairing wrong and the app either refuses to launch or silently runs on the CPU. For video lip-sync later, have both a source image and an audio file ready to drag in at the same moment.
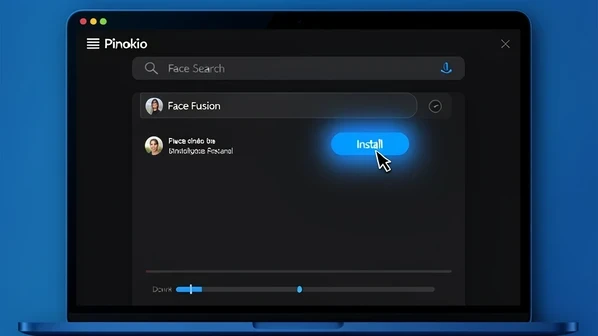
Easiest path: install FaceFusion locally with Pinokio (1-click)
Pinokio handles the install for you. Open the Pinokio search bar, type Face Fusion, and click Install. The installer pulls the GitHub repo, downloads dependencies, and runs setup without a single terminal command. When it finishes, launch FaceFusion straight from the Pinokio interface.
This route is free. The civitai community guide notes an optional $20 1-click installer that supports the project, but you are not required to pay anything to run FaceFusion through Pinokio. Beginners on Windows or Mac who want the GUI without touching a shell should start here.
Manual install from the terminal (Mac / Linux / power users)
The command-line install gives you a reproducible setup and works cleanly on Mac and Linux. The magichour walkthrough lays out the sequence: clone, isolate, install, launch. Each step below maps to one command.
- Clone the repository:
git clone https://github.com/facefusion/facefusion, thencd facefusion. - Create a virtual environment with
python3 -m venv envand activate it usingsource env/bin/activate. - Install packages:
python3 install.py --skip-conda --onnxruntime <provider>, swapping in the provider that matches your GPU and CUDA version. - Launch:
python facefusion.py run --open-browser, then open the GUI link it prints.
The --onnxruntime <provider> flag is the one to think about. It decides which compute backend gets compiled in, so a Mac user passes the Core ML build and an Nvidia user passes the CUDA build. If the launch throws an error, read the logs in the terminal. They almost always name the dependency that failed, which turns a vague crash into a specific fix.
Pick the right execution provider for your GPU
This is the setting people leave wrong, and it costs them the most. The execution provider tells FaceFusion which hardware backend to run on. Pick the wrong one and tasks process inefficiently, sometimes falling back to the CPU while your GPU sits idle. The magichour guide is blunt about how much this matters for speed.
| Your hardware | Execution provider |
|---|---|
| Apple Silicon Mac | Core ML |
| Nvidia GPU | CUDA |
| AMD GPU | The AMD option |
After selecting the provider, confirm the GPU is actually doing the work before you queue a heavy job. Watch GPU utilization in your system monitor during a quick test swap. If usage barely moves and the CPU spikes instead, the provider or the matching onnxruntime build is wrong, and you are about to wait far longer than you should.
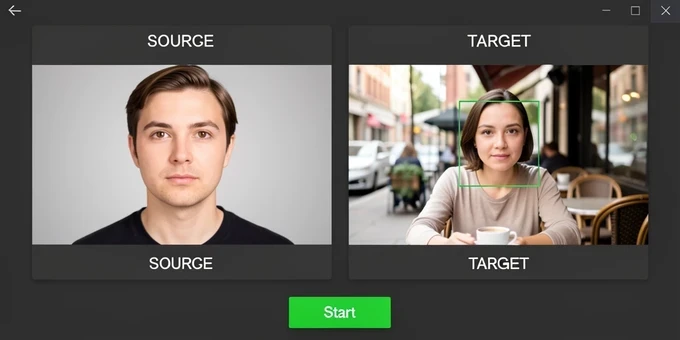
Do your first image face swap
Two inputs drive every swap. The source is the face you want to apply. The target is the destination image where that face lands. Load both with the Load button, keeping the roles straight, because reversing them swaps the wrong direction.
- Set the source to your headshot and the target to the destination photo.
- Enter Reference Face Selector mode and click the specific face you want replaced.
- Pick a swapper model, adjust size, position, and rotation if needed, then click Start.
- Review the merged output and save it.
Reference Face Selector matters most when the target holds more than one person. It pins the swap to a single chosen face instead of guessing. Run a source headshot onto a target photo and you get a clean before and after in one pass, which is the fastest way to confirm your install works end to end.
Choosing swapper and enhancer models for quality vs speed
FaceFusion ships several swapper models: InSwapper 128, InSwapper FP16, BlendSwap, SimSwap, and UniFace. For most work, InSwapper 128 is the right default. The magichour testing calls it a good balance of quality and speed, which is exactly what you want for a first pass or an iteration loop.
InSwapper FP16 pushes quality slightly higher, but it runs significantly slower. That trade only pays off on a final render where the extra detail is worth the wait. A practical rhythm: draft with InSwapper 128, then re-render the keeper with FP16 once you have committed to the shot.
Swapper models work at low resolution, so raw output often looks soft. That is expected, not a bug. Add a face enhancer pass to recover detail. CodeFormer, GFPGAN, GPEN-BFR, and RestoreFormer all do this, and the civitai guide lists them as the standard upscalers. One caution from testing: GFP-GAN 1.4 takes longer to render, so weigh the cleanup against the clock. A low-res swap fixed by a single CodeFormer pass is the most common quality save in the whole workflow.
Swap a face in a video (with optional lip-sync)
Video follows the same logic with one trap. Load the video as the target, set your source face, and the swap applies frame by frame. Render time scales with the video's length, clarity, and resolution, as the mimicpc walkthrough notes, so a long high-resolution clip is a genuine commitment of GPU time.
Lip-sync is where people get stuck. To drive the mouth with audio through Wav2Lip_GAN, you have to drag the image and the audio file into the source field at the same time. Load them separately and the lip-sync simply will not engage. Both files, one drop, into the source.
For clarity, tune FACE SWAPPER PIXEL BOOST and FACE ENHANCER BLEND rather than leaving them at default. Nudge them up incrementally and preview a single frame before committing to a full render. Maxing both out wastes time and can over-sharpen the result, so small steps win.
When local install fails: troubleshooting
Most failures trace to a handful of causes. Work through them in order, and read the launch logs first, because they name the failing dependency directly.
- The onnxruntime build does not match your execution provider or CUDA version, the single most common install error.
- The wrong execution provider is selected for the GPU you have, so the app runs slow or stalls.
- You are on an outdated FaceFusion version that misses fixes; update to the current release before anything else.
- A missing dependency, which the terminal log will name on launch.
A concrete example: the app crashes on start and the log mentions an onnxruntime CUDA provider that failed to load. The fix is to reinstall the onnxruntime build matching your installed CUDA version, not to reinstall the whole app blindly. Before any deep debugging, confirm you are on the current FaceFusion version, noted as 3.5.3 at the time of writing, since an old build can throw errors that newer releases already fixed.
Legal and ethical use
Running swaps locally does not put you outside the law. Using someone's face without consent can infringe their privacy and image rights, and reusing copyrighted source media can lead to intellectual property violations. The civitai guidance is clear on both points.
Get explicit consent from anyone whose face you apply or alter, and make sure you actually hold the rights to the source images or videos. When you share the result, disclose that it was AI-generated or altered. Keeping the media on your own machine protects your privacy, but it does not transfer anyone else's rights to you.
got my first swap done on a 3060, inswapper 128 then a codeformer pass and it actually looks clean ngl. the install was the only painful part