Restoring a Cropped Head with AI: the Two-Step Workflow
A cropped photo where the top of the head is missing cannot be fixed by a face swap alone. The face swap tool needs a face to work on, and the cropped area has none. The reliable answer is two passes: first, outpaint the missing region with an AI image extender so a plausible head and face appear, then run a face swap to replace that generic AI face with your actual likeness.
This guide walks through both passes with concrete tools, explains the pre-crop rule that prevents most failures, and shows how to fix the distorted eyes that AI models hallucinate when they invent faces from scratch. If your photo already has an intact body and only the face is wrong, skip to the single-step shortcut further down.
What 'adding your face to a cropped photo' actually means
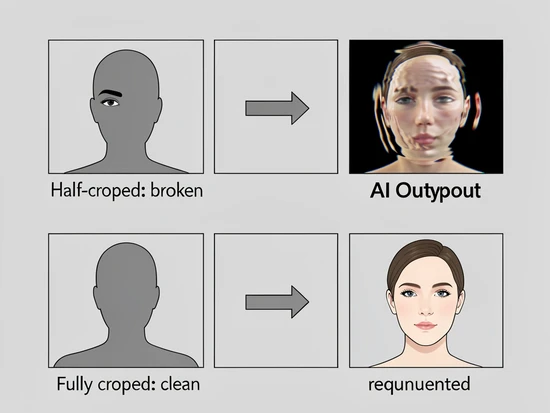
Two scenarios get lumped together under the same question. The first: the head is fully missing, cropped clean off above the shoulders. The AI sees a clean canvas above the body and can generate a new head freely. The second scenario is harder. The head is only half cropped: forehead and one eye remain, the rest is gone. That partial face provides conflicting pixel data to the model, and most extenders produce broken or warped output as a result.
A face swap tool by itself never solves either case. Face swap maps facial geometry from a source photo onto a target face region. If no face region exists in the target, there is nothing to map onto. That is why the cropped-photo workflow is two stages, not one.
- Step 1: outpaint or generative-fill the cropped area to produce a plausible face. The result is a complete photo, but with a generic AI-generated face.
- Step 2: run a face swap on that result, using a clear photo of yourself as the source. The AI replaces the generic face with your specific likeness while keeping the surrounding head and hair from Step 1.
- Single-step alternative: if the photo has a complete body and a complete face area but the wrong person, you can skip Step 1 entirely and go straight to face swap.
Before you start: preparing your photos
Most failed face swaps fail at the input stage, not the model stage. A few minutes of preparation removes the most common error sources.
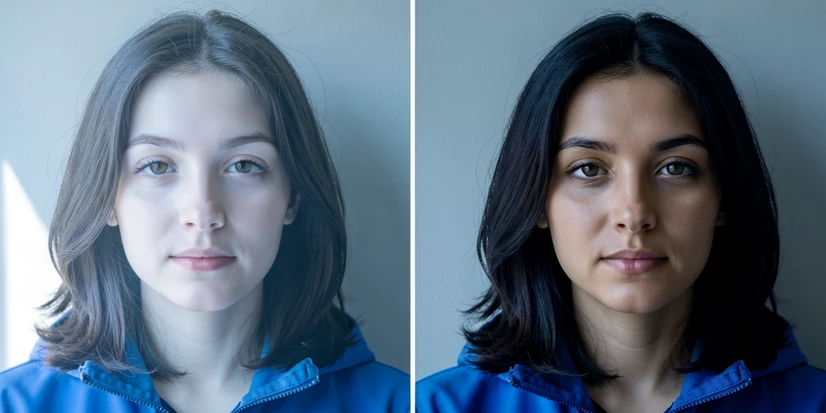
Source face photo
- Well-lit, with even light across the face. Side shadows confuse landmark detection.
- Fully visible: no sunglasses, no hands near the mouth, no masks. Deep-image.ai notes that partially obscured faces may not be recognized at all and can produce random output.
- A real photograph, not a cartoon, painting, or stylized illustration. The detector is trained on photographic faces and may simply not register an artistic drawing as a face.
- Front-facing where possible. Profile angles work but increase failure risk because the model has fewer landmarks to align.
Target photo (the cropped one)
Apply the pre-crop rule. If the head is only partially cut off, open the photo in any basic editor and crop off the entire head before uploading to the AI extender. Pincel's own documentation explains why: a half-cropped face provides conflicting pixel data that confuses the model. Removing it gives the AI a clean canvas to invent a full head from scratch, which is what it does best.
Resolution
Use the highest-resolution copy you have. Low-resolution input gives the AI less facial detail to work with in both stages, and the result reads as blurry or smeared. Run the source through an image enhancer first if it is small or compressed.
Step 1: reconstruct the missing area with Pincel AI Image Extender
Pincel's Image Extender is the cleanest first-stage tool for this job. According to the tool's own page, results return in under 20 seconds, which makes regeneration cheap. Plan to regenerate at least two or three times before picking a base.
- Open the Pincel AI Image Extender in your browser and upload the prepared cropped photo.
- Pan and zoom to position the existing image on the canvas. Choose square, portrait, or landscape mode to match the output dimensions you want.
- Write a short text prompt describing the head you want generated. Include hair color, skin tone, lighting direction, and scene context if those matter. Example: 'professional headshot, woman, dark hair, soft window light from the left'.
- Click generate. Within roughly 20 seconds the AI fills the cropped region with a new head and face.
- Inspect the eyes carefully. AI generative models frequently produce incorrect eye geometry when inventing a face from scratch, and uncanny eyes are the single most common artifact.
- If eyes are off, click regenerate. Multiple attempts are normal. Save the best base image: this becomes the input for Step 2.
Pro tip: pick a base where the hair color, hairline, and face shape roughly match yours, even though the face is generic. The closer the base is to your real geometry, the less work the face swap has to do, and the more natural the final blend looks around the jaw and hairline.
Step 2: inject your real face with Pixlr or Pincel Face Swap
The Step 1 output is a complete photo, but the face on it is a fictional AI-generated person. Stopping there is the second-most-common mistake people make. Step 2 replaces that generic face with your specific likeness while preserving the surrounding head, hair, lighting, and clothing from Step 1.
Pixlr AI Face Swap (recommended)
- Open Pixlr AI Face Swap in your browser.
- Upload the Step 1 output as the target photo.
- Upload your reference face photo as the source face.
- Click Run Face Swap. The tool aligns facial landmarks and blends the source face onto the target head, returning a PNG within a few seconds.
- Download the PNG. If the eyes still look off or the skin tone is mismatched, try a different reference photo with closer lighting to Step 1, or regenerate the Step 1 base and re-run the swap.
Pincel Face Swap (same-platform shortcut)
If you generated Step 1 in Pincel, the Pincel Face Swap module sits on the same platform and accepts your Step 1 output without re-uploading. This is the fastest path when you plan multiple regenerations of the swap, since it removes the upload round-trip.
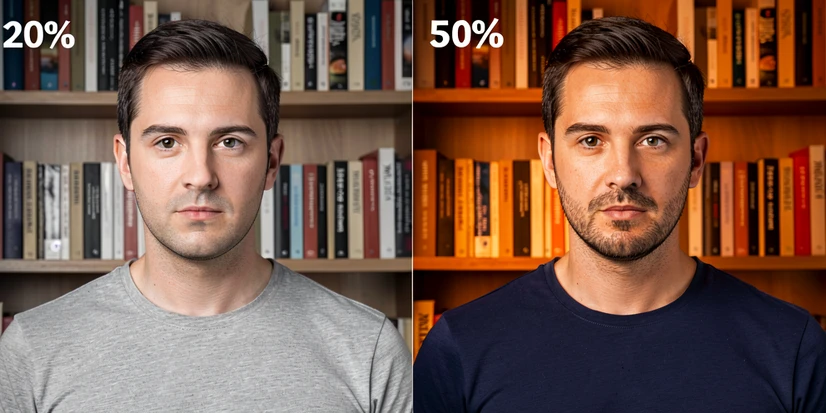
Deep-image.ai (when you want a strength slider)
- Upload the Step 1 output as the target.
- Upload your reference face as the source.
- Set the Reimagine Strength slider to roughly 20%. Deep-image.ai recommends this value to limit AI changes to the face area only.
- Optionally add a short text prompt describing lighting or skin tone if the source and target color temperatures differ.
- Click Generate, review, and download.
Why 20% specifically? Above that range, the model treats the prompt as a global instruction and starts altering clothing, background, and pose, not only the face. The slider is doing image-to-image diffusion, and higher strength means more steps where the model is free to redraw outside the face mask.
Pixa AI (text-prompt placement)
Pixa takes a different approach. Instead of clicking through a fixed pipeline, you describe placement in plain English: 'add this person into the photo next to the person in red'. The AI reads the prompt and decides position, scale, and lighting. Useful when the scene needs contextual blending rather than a straight one-to-one swap. Output is high-resolution and watermark-free.
Single-step shortcut for intact body photos
Not every cropped photo needs Step 1. If the body, scene, and existing face area are all complete and you only want to change whose face appears, skip outpainting entirely and go straight to a face swap or face-add tool.
- YouCam AI Photo Face Swap (PerfectCorp): upload the target photo, upload the face photo, pick the face to swap, and run. It supports multiple simultaneous face swaps in a single image, useful for group shots. The free tier offers 5 credits on sign-up.
- Fotor AI Photo Editor: better suited when you want to add an entire person to a scene rather than just a face. Its background-removal compositing flow lets you drop a cut-out person onto another image and blend lighting. PNG output, no watermark on the free tier.
- Topaz Labs AI Face Enhancer: not a face swap, but worth knowing about. The free tier covers up to 10 images and is the right tool when the existing face is just blurry or low-detail and you want to sharpen it rather than replace it.
Troubleshooting: fixing the most common failure modes
Almost every bad result traces back to one of six causes. Match the symptom to the row, apply the fix, and re-run.
| Symptom | Why it happens | Fix |
|---|---|---|
| Distorted or uncanny eyes in the generated face | Diffusion models hallucinate eyes from scratch and the inter-pupil distance, gaze direction, and iris shape often drift on the first try | Regenerate Step 1 several times. If eyes stay broken, run the output through a face swap with a clear reference photo: the swap pass overwrites the broken eyes with mapped geometry from your source |
| Half-cropped face produces broken or warped output | The remaining partial face gives the model conflicting pixel data; it tries to extend a face that is half-defined and fails to converge | Crop off the entire head in any basic editor before uploading to the extender, so the AI generates from a clean canvas |
| Swapped face looks pasted-on, lighting mismatch | Source and target have different light direction or color temperature, and automatic blending cannot fully reconcile them | Use a reference face photo with similar lighting direction and color temperature to the target. Prefer tools with automatic blending over manual compositing |
| Background, clothing, or pose changed unintentionally | Reimagine Strength slider was set too high; the model redraws areas beyond the face mask | Set Reimagine Strength to roughly 20% in Deep-image.ai, or use a swap tool that confines changes to the detected face region |
| Reference face is partially covered (sunglasses, hand, mask) | Face detection cannot map full landmark geometry from an obscured face and may not recognize a face at all | Use a different reference photo where the face is fully visible and unobstructed |
| Final result looks blurry or low-detail | Input resolution was too low; the AI had insufficient pixels to work with at both stages | Upscale source and target with an image enhancer before processing. Re-run both Step 1 and Step 2 on the higher-resolution copies |
Privacy and consent: before you add a real person's face
The technical part is the easy part. The harder question is whether you should run the workflow on a particular photo at all.
- Adding your own face to your own photo: no consent issue. Do what you want.
- Adding another person's face to a photo without their knowledge or consent: raises legal and ethical concerns in most jurisdictions, especially if the result will be shared publicly or used commercially. Get explicit consent first.
- Adding a face to a photo of a minor: extra caution required regardless of who is doing the adding.
- Adding a face to a photo intended to deceive viewers about a real event: do not.
On the data side, several tools publish clear policies. Fotor states that uploaded images are processed with encryption and are not used beyond providing the service. Pixlr states the creative output is yours to own and that content remains private and secure. These statements cover storage and reuse: they do not change the consent question above.
One useful clarification on the technology itself: Cloudflare's published documentation on its face AI pipeline explicitly limits the system to face detection, identifying which pixels represent a face, rather than facial recognition or identifying the same person across different images. Most consumer face swap tools work the same way. The model knows there is a face there. It does not know whose face it is.